
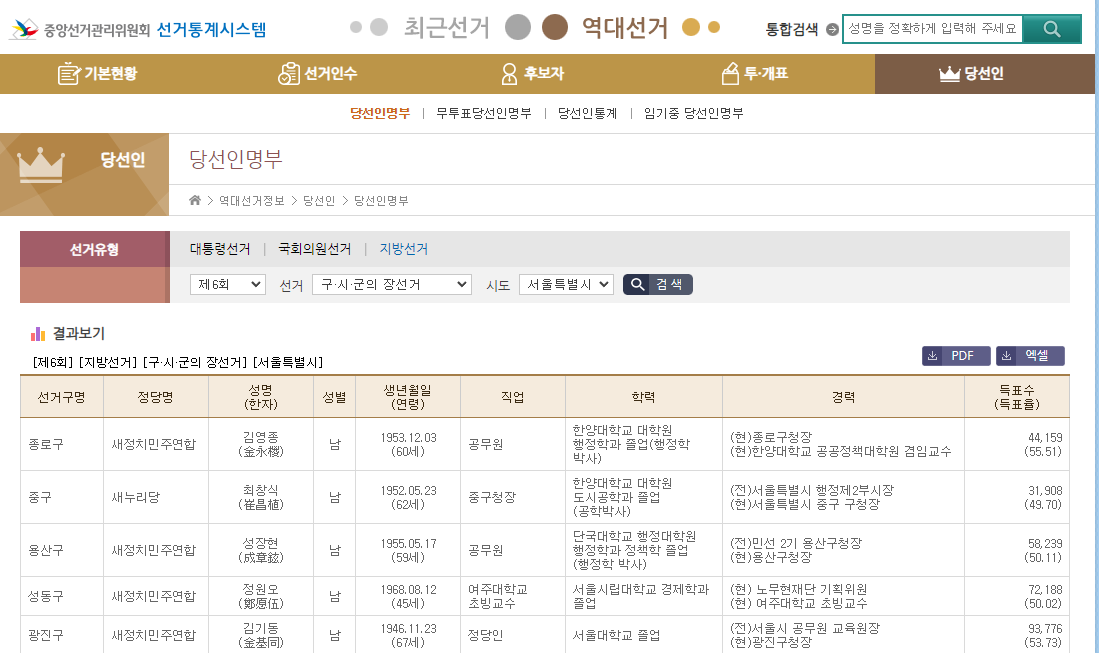
우리나라는 선관위가 운영하는 선거통계시스템이라는 포털을 통해 역대선거의 통계에 대한 데이터를 제공한다. 최근에 지역별 지자체장들과 관련된 데이터가 필요한 일이 있어서 잠시 살펴봤다. 여기서 수작업으로 데이터를 모으기엔 다소 귀찮은 점이 있는데 아래와 같이 크게 두가지가 있다.
- 민선7기까지 선출된만큼 살펴봐야하는 횟수 자체가 적지 않다.
- 광역지자체장은 선거 횟수에 비례해 나오지만, 기초지자체의 경우 가장 최근인 민선7기의 경우 16개에 달해 경우의 수가 증가한다.
- 위 가정에 따라 계산을 해본다면, 7[광역지자체] + (15 * 6 + 16) [기초지자체] = 113회 정도 데이터를 조회해야 할 필요가 발생
아쉽게도 위 사이트는 동적웹페이지라 BeautifulSoup으로 크롤링하기엔 한계가 있다. 이런 경우 (조금은 느리지만) 대안은 Selenium과 브라우저 드라이버(여기선 Chrome)를 활용한 방법으로 활용하는 것이 적절하다. 주의할 점은 Chrome은 매번 (자동으로) 업데이트가 되는만큼, 현재 크롬의 버전과 다른 버전의 드라이버를 사용하는 경우 동작하지 않을 위험이 있다.
관련링크:
- Selenium Docs (https://selenium-python.readthedocs.io/)
- Chrome Driver (https://chromedriver.chromium.org/downloads)
코드의 순서는 다음과 같이 동작하도록 구현하였다.
- 크롬을 통해 선거통계시스템에 접속
- 클릭을 통해 지방선거 당선인 명부에 이동 ("역대선거" > "당선인" > "당선인명부" > "지방선거" 탭을 클릭해 이동)
- 콤보박스의 내용을 가져와 리스트로 가져옴
- 리스트내 아이템 중 하나를 선택해 "검색" 버튼 클릭
- 조회되는 사이트의 표 내용을 가져와 Dataframe에 추가하기
- 콤보박스 아이템 리스트의 다음으로 iterate (4-5 반복)
- (번외) 한자가 인코딩이 안되는 문제를 해결하기 위해 한문이름 날리기
Version
Python = 3.8
Pandas = 1.3.1
BeautifulSoup = 4.9.3
Selenium = 3.141.0
(참고로 Selenium은 최근에 새로운 버전이 나와 최신버전으로 구현고자 할 경우 아래 코드가 동작하지 않습니다)
위 순서를 구현한 코드는 다음과 같다. 읽어보고 이해가 필요하다면, 각 순서별로 쪼개 살펴본 아래를 살펴보길.
import pandas as pd
from selenium import webdriver
from bs4 import BeautifulSoup
import time

def get_data(n_th, city):
    html = driver.page_source
    soup = BeautifulSoup(html, 'html.parser')
    col_name = [col.get_text() for col in soup.find_all('th')]
    data = [d.get_text().strip() for d in soup.find_all('td')]
    df = pd.DataFrame(columns=col_name)
    row_number = int(len(soup.find_all('td')) / len(col_name))
    for i in range(row_number):
        start = i * len(col_name)
        df.loc[len(df)] = data[start:start + len(col_name)]
    df['n_th'] = n_th
    df['city'] = city
    return df

driver = webdriver.Chrome('./venv/chromedriver.exe')
driver.get('http://info.nec.go.kr/')
driver.switch_to.default_content()
driver.switch_to.frame('main')

driver.find_element_by_class_name('eright').click()
driver.implicitly_wait(5)
driver.find_element_by_xpath('//*[@id="presubmu"]/li[5]/a').click()
driver.implicitly_wait(5)
driver.find_element_by_xpath('//*[@id="header"]/div[4]/ul/li[1]/a').click()
driver.implicitly_wait(5)
driver.find_element_by_xpath('//*[@id="electionType4"]').click()
driver.implicitly_wait(5)

df_election = pd.DataFrame()
election_name = driver.find_element_by_xpath('//*[@id="electionName"]')
n_th_election = [option.text for option in election_name.find_elements_by_tag_name("option")]
n_th_election = n_th_election[1:]
for n_th in n_th_election:
    election_name = driver.find_element_by_xpath('//*[@id="electionName"]')
    election_name.send_keys(n_th)
    time.sleep(3)
    election_code = driver.find_element_by_xpath('//*[@id="electionCode"]')
    election_code_lst = [option.text for option in election_code.find_elements_by_tag_name("option")]
    election_code_lst = election_code_lst[1:3]
    for code in election_code_lst:
        election_code = driver.find_element_by_xpath('//*[@id="electionCode"]')
        election_code.send_keys(code)
        time.sleep(3)
        if code == election_code_lst[-1]:
            # 시군구의 장의 경우만
            city_code = driver.find_element_by_xpath('//*[@id="cityCode"]')
            city_code_lst = [option.text for option in city_code.find_elements_by_tag_name("option")]
            city_code_lst = city_code_lst[1:]
            for city in city_code_lst:
                city_code = driver.find_element_by_xpath('//*[@id="cityCode"]')
                city_code.send_keys(city)
                driver.find_element_by_xpath('//*[@id="searchBtn"]').click()
                df_election = pd.concat([df_election, get_data(n_th, city)], ignore_index=True)
                time.sleep(3)
        else:
            driver.find_element_by_xpath('//*[@id="searchBtn"]').click()
            df_election = pd.concat([df_election, get_data(n_th, None)], ignore_index=True)
            time.sleep(3)

    time.sleep(3)

for ind in range(len(df_election)):
    itm = df_election.loc[ind, '성명(한자)']
    itm = itm[:itm.find('(')]
    df_election.loc[ind, '성명(한자)'] = itm
1.크롬을 통해 선거통계시스템에 접속
2.클릭을 통해 지방선거 당선인 명부에 이동
("역대선거" > "당선인" > "당선인명부" > "지방선거" 탭을 클릭해 이동)
우선 크롬드라이버를 통해 통계시스템에 접속하는 과정이다. 크게 설명이 필요한 부분은 아니니 스킵
from selenium import webdriver
import time
# 크롬 드라이버를 통해 통계시스템 접속
driver = webdriver.Chrome('./venv/chromedriver.exe')
driver.get('http://info.nec.go.kr/')
driver.switch_to.default_content()
driver.switch_to.frame('main')
# 지방선거 페이지로 이동
driver.find_element_by_class_name('eright').click()
driver.implicitly_wait(5)
driver.find_element_by_xpath('//*[@id="presubmu"]/li[5]/a').click()
driver.implicitly_wait(5)
driver.find_element_by_xpath('//*[@id="header"]/div[4]/ul/li[1]/a').click()
driver.implicitly_wait(5)
driver.find_element_by_xpath('//*[@id="electionType4"]').click()
driver.implicitly_wait(5)
3. 콤보박스의 내용을 가져와 리스트로 가져옴
선거 유형별로 선택하기 위해서는 화살표를 눌러 목록을 선택하는 방식인 콤보박스를 활용하고 있는데, 개발자도구를 통해 살펴보면 아래와 같이 나오는 것을 확인할 수 있다.
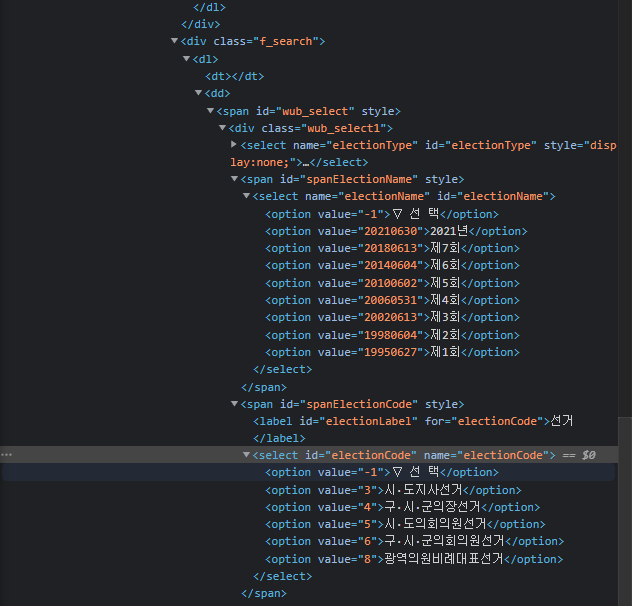
import pandas as pd
# 데이터를 넣을 빈 데이터프레임 생성
df_election = pd.DataFrame()
# 콤보박스 목록내 아이템 리스트로 만들기
election_name = driver.find_element_by_xpath('//*[@id="electionName"]')
n_th_election = [option.text for option in election_name.find_elements_by_tag_name("option")]
n_th_election = n_th_election[1:]

election_code_lst = [option.text for option in election_code.find_elements_by_tag_name("option")]
election_code_lst = election_code_lst[1:3]

city_code_lst = [option.text for option in city_code.find_elements_by_tag_name("option")]
city_code_lst = city_code_lst[1:]
위에 코드는 선거회차, 선거유형(광역지자체, 기초지자체 등) 및 시도를 보관하기 위한 리스트를 만드는 코드이다. 다만, 내가 원하는 정보만 가져오기 위해 리스트 중 일부만 발췌해서 리스트를 재정의하였다.
(e.g. election_code_lst = ['시도지사선거', '구시군의장선거'])
4. 리스트내 아이템 중 하나를 선택해 "검색" 버튼 클릭
콤보박스는 하나를 선택할 때에는 해당 요소를 찾아 send_keys 메써드를 사용해주면 된다. 여기서 주의할 것이 광역지자체와 기초지자체 선거 페이지의 경우 "시도"에 관한 콤보박스가 있느냐 없느냐 문제가 있는데, 이건 if문으로 해결해주자. 즉, 위에서 만들어준 election_code_lst의 아이템(code) 중 끝에 있는 값을 선택했느냐 여부에 따라 "시도" 콤보박스 관련 코드를 실행여부를 결정하게끔 한다. 코드는 다음과 같이 할 수 있다. (위의 3단계도 같이 포함)
# 회차 선택
for n_th in n_th_election:
    election_name = driver.find_element_by_xpath('//*[@id="electionName"]')
    election_name.send_keys(n_th)
    time.sleep(3)
    election_code = driver.find_element_by_xpath('//*[@id="electionCode"]')
    election_code_lst = [option.text for option in election_code.find_elements_by_tag_name("option")]
    election_code_lst = election_code_lst[1:3]
    # 선거유형 선택
    for code in election_code_lst:
        election_code = driver.find_element_by_xpath('//*[@id="electionCode"]')
        election_code.send_keys(code)
        time.sleep(3)
        if code == election_code_lst[-1]:
            # 시군구의 장의 경우만, 시도 선택
            city_code = driver.find_element_by_xpath('//*[@id="cityCode"]')
            city_code_lst = [option.text for option in city_code.find_elements_by_tag_name("option")]
            city_code_lst = city_code_lst[1:]
            for city in city_code_lst:
                city_code = driver.find_element_by_xpath('//*[@id="cityCode"]')
                city_code.send_keys(city)
                driver.find_element_by_xpath('//*[@id="searchBtn"]').click() #검색버튼 클릭
                time.sleep(3)
        else:
            driver.find_element_by_xpath('//*[@id="searchBtn"]').click() #검색버튼 클릭
            time.sleep(3)
5. 조회되는 사이트의 표 내용을 가져와 Dataframe에 추가하기
일반적으로 BeautifulSoup은 동적웹페이지에서는 힘을 발휘하기 힘들지만, Selenium을 통해 소스를 가져오면 적용이 가능하다. 주어진 테이블의 데이터를 가져오기 위해 열이름을 위한 'th', 데이터를 위한 'td'를 찾아준다. 그렇게 해서 만든 Data frame을 반환하는 함수를 get_data(n_th, city)로 해서 작성해보았다.
from bs4 import BeautifulSoup
def get_data(n_th, city):
    html = driver.page_source
    soup = BeautifulSoup(html, 'html.parser')
    col_name = [col.get_text() for col in soup.find_all('th')]
    data = [d.get_text().strip() for d in soup.find_all('td')]
    df = pd.DataFrame(columns=col_name)
    row_number = int(len(soup.find_all('td')) / len(col_name))
    for i in range(row_number):
        start = i * len(col_name)
        df.loc[len(df)] = data[start:start + len(col_name)]
    df['n_th'] = n_th
    df['city'] = city
    return df
그리고 이렇게 작성한 get_data함수를 기존 데이터 프레임에 추가할 수 있도록 조치해주자.
if code == election_code_lst[-1]:
    df_election = pd.concat([df_election, get_data(n_th, city)], ignore_index=True)
else:
    df_election = pd.concat([df_election, get_data(n_th, None)], ignore_index=True)
6. 콤보박스 아이템 리스트의 다음으로 iterate (4-5 반복)
Iterate은 For문으로 반복하면 되는거고, 위 내용들을 총 종합해서 만들어주면 된다. 코드는 위를 참고
7. (번외) 한자가 인코딩이 안되는 문제를 해결하기 위해 한문이름 날리기
이렇게 가져온 데이터를 활용하기 위해 파이썬 자체에서 처리할 수도 있지만, 엑셀 등으로 옮겨서 처리하고 싶은 경우도 있을 것이다. 이 경우 인코딩 문제가 발생하는데, 성명부분에 한자이름에서 인식을 못하는 문제가 발생한다. 따라서, 이 문제를 해결하기 위해 한자명을 제거하는 코드를 작성하였다.
사실, 한자코드를 직접 읽어서 처리하기 보다는 한자명이 ( )안에 있다는 점에서 착안, '('을 기준으로 데이터클렌징을 해준게 전부인데, 여기서는 잘 작동한다.
for ind in range(len(df_election)):
    itm = df_election.loc[ind, '성명(한자)']
    itm = itm[:itm.find('(')]
    df_election.loc[ind, '성명(한자)'] = itm
사실 데이터가 당장 필요한 상황에서 수작업이 귀찮아서 짠 코드다보니, 예외처리를 넣지 않았거나, 최악의 경우 for문이 3번까지 중첩이 가능하는 등 코드의 효율성을 보자면,,,, 잘 모르겠다.
'Python > Data Prep' 카테고리의 다른 글
| Colab에서 Kaggle 데이터셋 가져오기 | Kaggle, API, Colab (0) | 2024.08.10 |
|---|---|
| Selenium 을 활용한 Element 찾기 (find_element, By) | Python, Web Scraping, Web Crawling, 자동화 (0) | 2022.08.09 |
| 파이썬으로 여러 페이지에 있는 정부 보도자료 크롤링하기_페이지네이션 | Web Scraping (0) | 2021.10.04 |
| [Data Prep] 제멋대로인 주소(광역지자체명) 표준화하기 (0) | 2021.08.15 |
| 금감원 XML 파일(corp_code) python으로 읽어내기 (0) | 2020.03.14 |